
Categorial links below will take you to the specific sections of the article
Club Management |
Front Desk and Instructor |
Member's View |
Overview of Booking and Attendance
The Class and Program Bookings solution provide complete control and flexibility for you and your club management to operate the club operations smoothly. Manage all of your club's booking requirements like classes, services, programs, etc. across mobile and web apps. Smart Health Clubs provide options to:- Setup Company-wide and Department specific booking and attendance policies
- Setup booking policies for a particular class
- Seamlessly manage bookings
- Manage and mark the attendance
- Member's Overview on Booking and Attendance
- Create and manage Resources easily
Setting up Booking and Attendance Policies - Company-wide or Department Specific Policies
To set up Booking and Attendance policies, head to Create, then Company, > Booking and Attendance Section. On this page are multiple options and features that you can enable or disable in relevance to your club's operations. Below is a detailed explanation of all the options present:- This option should show members a canceled class on the calendar. Unchecking this option would not show the canceled classes on the calendar. The canceled class will have the word " Cancelled " and the class details will be strikethrough.

- Close the Cancellation Window ( for Members ). This option should start working or showing up _____ hours before the class
- Show the Attendance Button ( For Instructors ). This option should start working or showing up _____ hours before the class.
- Available Spot shows the number of spots left on the calendar for a class
( ex 5/10 - 10 being the total number of spots )
Booked Spot shows the number of spots booked for the class
( ex. 8 - Total number of spots not shown )
- Shows the number of spots once a limit is reached or if there is only a certain availability is left ( ex, the total number of spots is 10, seven gets filled, the number entered is 3, then the last three remaining spots will show up as per above settings )

- This option allows your front desk and staff member for the location to manage the booking and attendance. If the option for " All Staff members " is checked, only then the instructors/ trainers can mark attendance for the classes in their department

- Allows you to restrict how many times a member can book classes in a day/days

Best practice – 1 time in 1 day
- Restricts members to book two classes with the same timings

- How many members can waitlist for a class if it is fully booked?

- Show member their waitlisted number for a class

- This particular option allows you to choose how a waitlisted member gets the spot if a spot becomes available:

1. The first option ensures that the newly vacant spot gets assigned to the first waitlisted member ( This option should not be used in the departments that have fee-based classes)
2. The second option notifies all the waitlisted members as soon as there is an open spot in a class, the first member to action and click on the notification gets assigned the spot
3. The third option notifies all the waitlisted members in an orderly (waitlisted #1, #2, #3..... ) in a set-minute gap. If the #1 waitlisted member did not action for the spot through the notification, it is sent to #2 and so on. The member who accepts through the notification gets the spot. - Sends an in-app notification and an email reminder to the member about the booking.

- Sends a reminder to the members informing them about the ending of the class according to the schedule of the class

Cancellation options. For department-specific policies, the cancellation options will be applicable for classes and services under that department.
- This option allows the club management to set a late cancellation window for a member if they cancel a booked class spot in a certain time frame before the class starts. The clubs can also charge the members if they cancel in this window.

Attendance Options for Instructors
- The club management can send reminders to instructors and that too for certain days for the Instructors/ Trainers to mark class attendance.

Member Attendance options
- Members can mark their attendance for a class once they check in to the club and complete a class. Club management can define a period for the members to mark their attendance before the class begins.
As the name suggests, once the member is checked in to the club they can mark their attendance if this option is checked.
- The club can also enable the option that ensures that members need to be physically present in the club to mark the attendance.
- Members who were previously on the waitlist can also mark their attendance once they get moved to an available slot.
- Club management can automate attendance marking for members as per the options
available.
- Clubs can choose to send an email to members in the following cases.

Creating Department-Specific Policies
All the options mentioned above when creating Booking and Attendance policies can be applied to a specific department and the club management can have multiple policies assigned to different departments.
To create a department-specific policy, navigate to Create => Company => Booking and Attendance
 Upon clicking, a window will open will all the options of Booking and attendance. Select the department to which you want to assign the policy, set the options for booking and attendance policy, and click save. You can later edit or delete the department-specific policies by clicking on Edit or Delete as shown in the image.
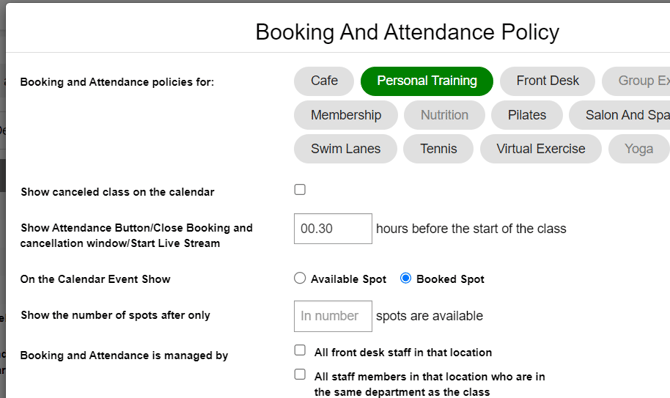
(back to top)
Booking option for a Class
We understand not all the classes operate in the same way and some classes may have some specific requirements within a defined department. Clubs might need to have some exclusions or more features in terms of booking and attendance for a particular class. Smart Health Clubs makes sure that the classes, services, and even programs can have specific booking policies within a department. Here is a quick overview of these options and use cases!
- Check this box if you want the members to book this class
When creating a bookable class, make sure this check box is marked!

- Define the number of spots this class accommodates

In a event calendar when scheduling a class and choosing a resource if both the Class and Resource have the Number of spots filled, the number of spots from the Resource will take preference
- The relative booking window allows the clubs to choose to select the same window opened for members for different schedules of the same class. This means, that if the class is not scheduled at regular intervals, irrespective of the schedule, the booking window will open at a certain time of the day, for example, 7 am

- With this option checked, the members can see who has booked the classes

- In the case the clubs are using the calendar from one of the billing companies ( ABC, Jonas, etc. ) to schedule classes and display them to the members on the Smart Health Clubs mobile app, clubs need to select a related class for which they can set a booking window. Once selected and synced, the calendar schedule will show up on the mobile app.

- Clubs can email the members who booked the class but did not show up after a certain period of the class.

Members will receive an email and a notification if their attendance is not marked in the No-Show window
- Check this option if you want to remove any booking limitations for booking this class for members.

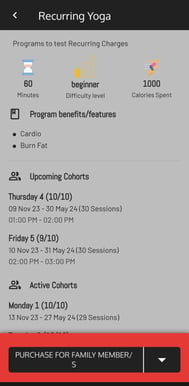
- Clubs can allow members to book their family members in a certain class

- Clubs can choose to allow members to bring in guests to certain classes. Input one if members cannot bring guests

- When booking guests, members need to be present for the same class when this option is checked

- Choose this option if a class spot occupies more than one person. This option needs to be used along with the " bring in guests option " to allow the members to bring in guests as the booked spot accommodates more than one person. These options are relevant where the spot mainly implies a table booking or an event

(back to top)
Managing Booking
On the Web App, you have the option to create bookable spaces that match the layouts of your class studios, swimming pools, and courts. This feature enables your members to book their preferred bike, spot, lane, or court. Additionally, your club staff can manage waitlists and bookings, mark attendance, and send messages to communicate with the members.
When permitted to manage booking and attendance for a location by staff members
( feature link ), the instructors/trainers will be able to manage booking and attendance for the classes in the location in which they are the trainers.
How can you Assign Front Desk roles or coach/ manager roles to manage booking and attendance?
Web App: Manage > Staff Members
• Select the staff member on the Roles page and assign them:
1. The Front Desk department
2. The Coach or Manager role
Be careful who you give this role to as this person will be able to access bookings, attendance, and passwords.
Managing Fee-Based Bookings for Front Desk and Staff
Web App
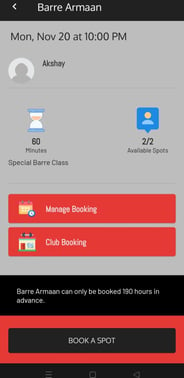
On the Web app, Instructors or Front Desk staff can go to the event through calendar or to the Dashboard and then the Calendar option. In the Calendar tab, they can see the future and completed events. For future events/ classes, the manage booking option provides the feature to:
- Check the booked members and waitlisted members.
- A booking for a member can be made from the Add User button.
- Member can be removed easily from the booked class.
- Front Desk and Staff can provide a free session to members for Fee based classes and Programs.
- Front Desk staff can book sessions for fee based class for members and charge the members through their cards on file
- Front Desk can send Payment links to members and non-members for fee based classes.

Mobile app
Instructors and Front Desk staff can also manage booking and attendance for members through the Mobile app.
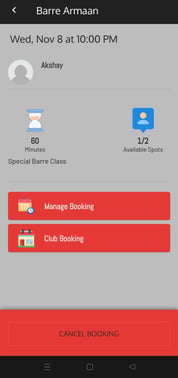
Mobile App > Club > Department> Calendar> Event
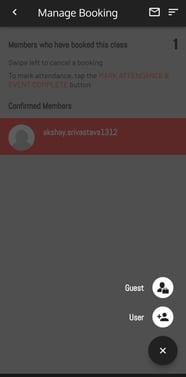
- Event refers to a specific instance of a class on the calendar.
- To manage booking for the event, touch the Manage Booking button. To add a member or a guest, touch the + Button on the bottom, search for the member, and touch their name.
- To cancel the booking for a member, swipe left on the member's name.
.jpeg?width=186&height=378&name=WhatsApp%20Image%202023-11-07%20at%2021.46.24%20(2).jpeg)
.jpeg?width=184&height=378&name=WhatsApp%20Image%202023-11-07%20at%2021.46.24%20(1).jpeg)
Calendar Page
Front Desk and Staff members can manage bookings directly through the Calendar page for a seamless experience.
To manage booking from the calendar page, navigate to :
- Create
- Calendar
- Select the Department
- Select the event on the calendar
- Click on Manage Bookings to add a member/ Guest


CLUB BOOKING OPTION
To check bookings for all calendar events, click the Club Booking button. This shows all members who have booked classes starting from the current time and all members who have booked for that specific day.
This is useful for managing club access by members.
(back to top)
Managing Attendance
Instructors and Front Desk staff can use the Reports functionality to manage attendance for members on the web app.
Web App
Manage > Reports > Attendance Reports > Class Name
Instructors can use this section to -
a. Mark Attendance for specific members.
b. Add members after the fact.
c. Mark an event as completed.
An instructor can also add a headcount for their class anytime after the class is completed.
Mobile App
Instructors and Front Desk staff can mark attendance for members in a few seconds!
Mobile App > Club > Department > Calendar > Event
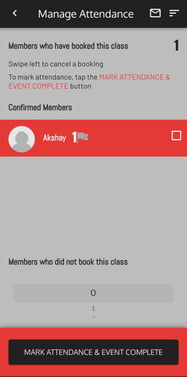
• Instructor along with Front Desk.
• The Mark Attendance button is shown xxx minutes (specified by the club management) before the start of class till 30 minutes after class ends. The Attendance page has a list of all members who have booked the class along with the waitlisted members.
• To mark attendance, touch the checkbox after the member name.
Instructors or Trainers should mark the attendance of members in one go once the class ends. Any checked marked member attendance will not be saved if the trainers exit from the mark attendance page. Additionally, trainers cannot add any members once the Mark Attendance and Complete Event button is clicked.
After this, if spots are available, instructors can allow members who are on the waitlist or queued outside to take the class.
How can members mark their own attendance and make bookings at the front desk?
If the club’s attendance policy requires members to be physically present, there are two primary ways they can mark their attendance upon arrival:
1. Using Location Access via the App
- Members can allow location access to the club app. This enables the app to confirm their presence at the club and allow them to mark attendance directly.
- For first-time users, a prompt will appear within the app requesting location permission. Once granted, the member can seamlessly check in.
- Alternatively, location access can be enabled manually by going to: Device Settings > Apps > [Club App] > Permissions > Enable Location Access.
2. Scanning Barcodes at the Front Desk
- If members prefer not to share their location, they can head to the front desk and scan their member barcode to check in.
-
Barcode scanning allows them to mark their attendance without needing location access.
- Along with marking attendance, members can also quickly book classes at the front desk using the same link.
How to Enable Barcode Scanning and Bookings at the Front Desk
To set up the barcode scanning and bookings system at the front desk:
- Go to Create > Company > Kiosk Pages (scroll to the bottom of the page). Here, you’ll find booking and attendance checkboxes for all departments.
- Select the departments where you want to enable barcode scanning and front desk bookings.
- Once selected, click the green button with the department name to open the link. (see Screenshot 1).
- Scan their barcode to check in, or
- Manually enter their barcode number in the search bar.This will launch the barcode scanning interface, where members can:
- Members can also book a class directly from this page (Screenshot 2).
Screenshot 1:

Screenshot 2:

Member's Overview on Booking and Attendance
We understand that club operations can be difficult and having a seamless booking and attendance feature with just a few selections makes everyone's life easier.
We, at Smart Health Clubs have developed options for clubs such that they can choose to let the members manage their Family member's bookings, cancel a class, waitlist themselves, and mark their attendance if allowed by the club!
Web app
Clubs can provide a URL for their members to make bookings on their website. You can go to Web App > Club > Relevant Department > Calendar tab > Copy the URL for this page > Provide it on your website.
-
- Once a member clicks on this URL, they will be shown all the calendar events.
- If they would like to make a booking, they can go to Calendar > Pick a slot > Book a Spot.
- They can use the same section to Cancel a Booking or Waitlist themselves.
Mobile App
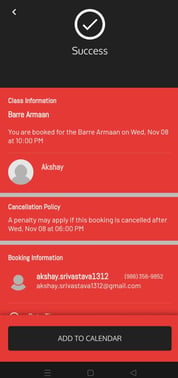
Club > Department > Calendar > Event > Book a spot
- The Book a Spot button will always be available to Members, but if a member attempts to book before the Booking window opens, they are asked to retry after the booking window is open.
- Members can waitlist themselves through the same button once a class is fully booked and the waitlist is allowed by the club and they can cancel a booking through the same.
- The booking confirmation is shown on the Barcode page on the App.
- Members may optionally add the event to their phone calendar.
- Once the cancellation window is closed, the Cancel Reservation button is replaced by the Mark Attendance button.
The Mark Attendance button is only shown if Marking attendance by members is allowed by the club.
How can Members mark their own attendance?
Members can mark their own attendance for upcoming classes directly through the app.
Please note: This feature is available only if your club’s booking policy allows members to mark their own attendance.
To mark your attendance:
- Open the app and go to the Club page
- Select the relevant Department.
- Tap on Calendar and choose your upcoming class.
- Tap Mark Attendance.
Once done, a confirmation message will pop up: “Attendance Marked Successfully.”


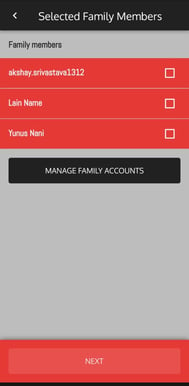
Family Accounts
Members can make bookings for guests and family members. They can create profiles for their family members – including specialized profiles for kids with all necessary information. This allows your members to easily book their family members into programs, classes and camps.
It works the same as booking a spot, rather the option also allows one to add family members once their account has been added to the mobile app.
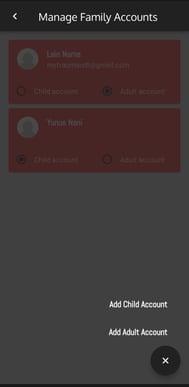
To manage family accounts, the members need to navigate to the Profile section of the app, and at the bottom, they can add a Child account or an Adult account. Once the required fields are provided, the family account is created as a group in the backend and it can be managed through the mobile app.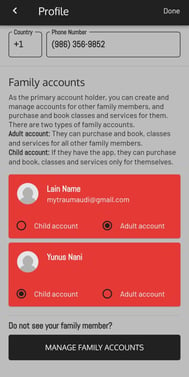
Members can also use the Web app to book classes for family members. To create or manage a family account, the members need to log in to their Web app, navigate to Home, and then profile. On the bottom, the members can create and manage Child Account or Adult Accounts and manage them.
Members can also purchase sessions for fee-based classes, services, and programs for their family members through the web app as shown.
(back to top)
How to Create and Manage Resources
Resources functionality provides a great user experience to members when booking classes, reserving courts, and booking services. The members can choose their favorite spots, get an idea about the layout, and experience hassle-free sessions.
Resources with a custom layout can be created by navigating to:
Web App > Create > Clubs > Choose the Location of your Club from the Top Left corner of the Web App > Resources > Click on the Add a Resource option 
On the Add Resource option, you can enter details such as resource name and details, and if you do not want a Layout for your resource and want only spots to be booked by your members, then you can enter the details in the number of spots.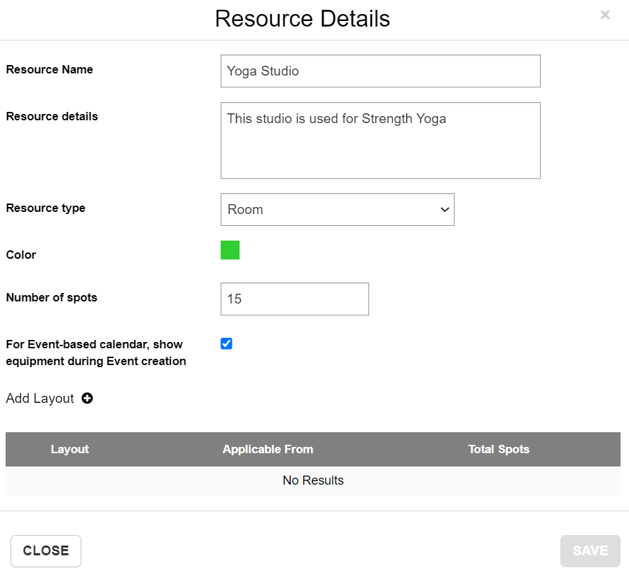
Best practice – Specify the number of spots in Resource if the class takes place always in a specific room/studio/court, AND the number of spots remains constant from one class to another (for example the number of bikes, courts, pool lanes, etc.).
Best Practice – Specify the number of spots in Resource if the class is taught in more than one club location. This is important for Clubs that have more than one location.
Best Practice - Specify spots only under Classes if the Resource (room, field, etc.) can change from one class to another.
Best Practice – Leave the number of spots empty both in Class and Resource if the calendar event can accommodate unlimited bookings.
If you would like to add a Layout, click on the Add Layout button and create a grid for bookings such as Spin room bookings, Swim Lane bookings, etc.
Once a Resource is created, you can edit it or delete it by selecting the required Resource and clicking on Edit or Delete on its right.
(back to top)
Editing the Layout of a Resource
Once a Resource is created, you can perform tasks such as adding types of equipment to the layout; changing the number of spots bookable; setting unavailability for one or multiple spots on the Resource Layout, and selecting how many members can be booked in one spot.
To do so, go to:
Web App > Create > Clubs > Choose the Location of your Club from the Top Left corner of the Web App > Select the required Resource and click on it > Select the Update option
Under the Update option, you can add types of equipment to the layout and set unavailability by choosing any tile on the layout and entering details in the options that appear above the Layout diagram. You can also Delete any spot by choosing equipment or a spot in the layout and clicking the Delete option.
Resource with multiple bookings
Multiple members or their guests can book one spot or bookable equipment in a Resource. An example where this would be very useful is for a Tennis Court or in a Cabana setting.
To do this, you first have to enable the option to accommodate more than one person in a spot in:
Web App > Create > Classes > Select the Required class > Select the Booking Tab > Check the option 'Does the spot accommodate more than one person?' (click to view)
Once done you can go to the Resources Section and edit which spot or bookable equipment can accommodate more than one person. To do so, go to:
Web App > Create > Clubs > Choose the Location of your Club from the Top Left corner of the Web App > Select the required Resource and click on it > Select the Update option > Select one or more bookable equipment from the Layout > Enter number of people to be accommodated in the option "This equipment accommodates"