
A. For Directors - How to set up Booking policies for your club?
B. For Directors - How to set up Attendance Policies for your Club?
C. How a Front Desk Staff member can Manage Bookings and Mark Attendance for members?
D. How can Instructors Mark Attendance for Members?
E. How can Members Book a Class and Mark Attendance/Check-In For Themselves?
H. Book Classes and Mark Attendance via Kiosk Pages
A. For Directors - How to set up Booking policies for your club?
- How to set up policy decisions for the entire Club? (Screenshot 1.1)
| What? | How? |
|
How often can members book a class? |
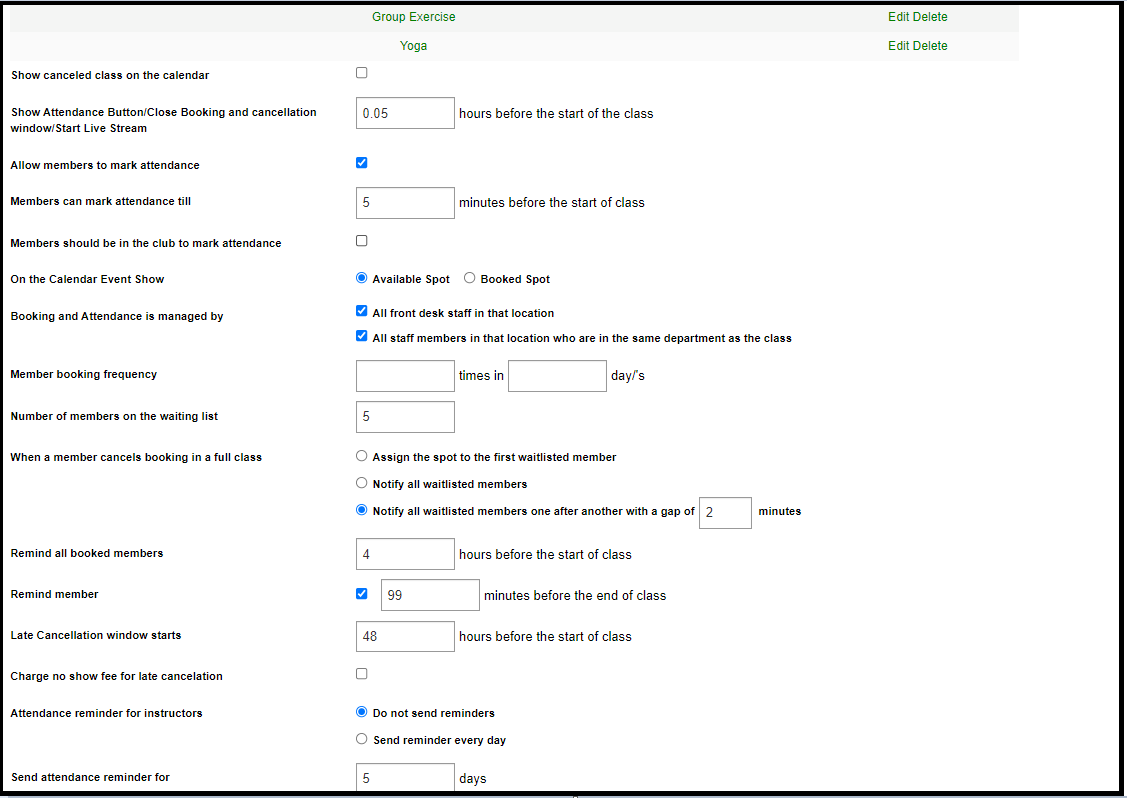
Go to Web App: Create > Company > Booking and Attendance • To limit the number of bookings a member can do in a day, go to Member Booking Frequency and set the number (xxx) of times a member can book a class in (yyy) days. • This can also be implemented for a specific department. • Best practice – 1 time in 1 day |
|
The number of members on the waiting list and waitlist types. |
Go to Web App: Create > Company > Booking and Attendance • To set how many members can be on the waiting list for a class, set the number for the Waiting List. If you do not want a waiting list, set this number to 0. • There are 2 ways that the waitlist can be set up for a club - 1. Assign the First Spot to the waitlisted member - In this case, if an existing booking is canceled by a member, the first person on the waitlist will be assigned the newly opened spot. Please note that this policy will not be applicable for Fee-based classes as we do not charge members when we waitlist them. 2. Notify all waitlisted members - In this case, when a spot booking has been canceled, all members in the waiting list will receive a notification allowing them to make a booking in the class. 3. Notify all waitlisted members one after another with a gap of X minutes- Members can now be notified about an open spot one after another instead of all waitlisted members being notified after a gap of certain minutes. You can set the gap in the field provided under this option. • Best practice – Set the Waiting List to 5 |
|
Allow Open Spots to be booked by waitlisted members only |
|

Screenshot 1.1
-
How to set up Booking policies for a specific class?
|
What? |
How? |
|
Allow a class to be booked |
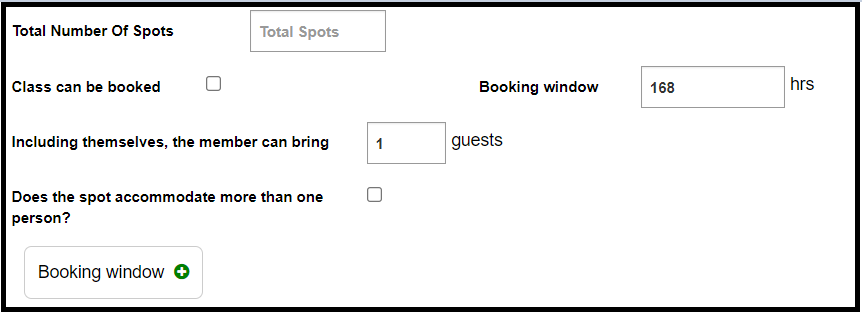
Web App: Create > Classes > (Class you want) > Booking Tab • To allow a class to be booked, checkmark the Class can be booked box. |
|
Message No Show Members for a class |
Web App : Create > Classes > (Class you want) > Booking Tab
|
|
Booking Guests |
Members now have the option to book spots for other members/Guests. In order to make this functionality accessible to members, you would have to go to: Web App: Create > Classes > (Class you want) > Booking Tab> Place the number of guests/members to be booked including the booking member. Refer to screenshot 1.2 |
|
Set Booking Window |
Web App: Create> Classes> (Class you want) > Booking Tab • Booking window implies how many hours before the class can a member book a class. • To set a booking window for a class fill the Booking window text box. • Best practice – Set the booking window to 48 hours |
|
Specify the capacity of a class |
Web App: Create> Classes> (Class you want) > Booking Tab • Fill in the Total number of spots for the class. |
|
Specify the capacity of a Resource (Studios, Rooms, Pools) |
Web App: Create> Clubs> (Club location you want) > Resources • Create a layout for bikes, courts, etc. which automatically fills in the Number of spots • OR fill in the Number of spots for a resource • NOTE: In a calendar event if both the Class and Resource have the Number of spots filled, the number of spots from the Resource will be used. • Best practice – Specify the number of spots in Resource if the class takes place always in a specific room/studio/court, AND the number of spots remains constant from one class to another (for example the number of bikes, courts, pool lanes, etc.). • Best Practice – Specify the number of spots in Resource if the class is taught in more than one club location. This is important for Clubs that have more than one location. • Best Practice - Specify spots only under Classes if the Resource (room, field, etc.) can change from one class to another. • Best Practice – Leave the number of spots empty both in Class and Resource if the calendar event can accommodate unlimited bookings. |
|
Show either available spots or booked spots on the calendar |
When members book an event using the App, they can view information related to the event that they are booking on the App. One vital piece of information is regarding the available spots or booked spots for the Event. You can decide to show which information to show on the App, whether it is the Available Spots for the Event or the Booked spots. In order to do so you need to go to : Create > Company > Booking and Attendance > Next to the On the Calendar Event Show option choose Available Spot or Booked Spot |
Screenshot 1.2
B. How to set up Attendance and Cancellation Policies for your Club - Director Level
A. Member Related Decisions
|
How |
Details |
|
How to allow members to mark attendance |
Web App: Create > Company > Booking and Attendance • To allow members to mark attendance, checkmark the Allow members to mark attendance box. • NOTE: The class Instructor will always be able to mark attendance for his/her class. The Front Desk can also optionally mark attendance. • Best practice – Marking attendance will need training for Instructors, Front Desk, and Members. So do not allow this in the beginning. If needed, allow Members to mark attendance later. |
|
How to set the Member Attendance marking window |
Web App: Create > Company > Booking and Attendance • Members and optionally Front desk can Mark attendance till xxx minutes before the start of class. This can be a negative number as well, in which case, members can mark attendance after the class has started. • Best practice is 5 minutes. |
|
How to remind members to wrap up their workout |
Web App: Create > Company > Booking and Attendance • To send a push notification to members to start preparing to wrap up their workout, check the Reminder members and put the number xxx of minutes before the end of class • Best practice – This is useful if you have to limit the number of members in your cardio or strength training areas. In that case, set it to 5 minutes. |
|
How to manage the number of members on the waiting list |
Web App: Create > Company > Booking and Attendance • To limit the number of members who can be on the waiting list fill the Number of members on the waiting list box. To eliminate the waiting list, set this to 0. • Best practice – 5 members |
|
How to assign the Front Desk department to a staff member |
• Select the staff member and on the Roles page assigns them: 1.The department, Front Desk 2.The Coach or Manager role Best practice – Be careful whom you give this role to. |
|
Who can mark attendance for a member |
• To allow Front Desk to mark attendance for a member, checkmark the All front desk staff at that location box. • To allow any instructor in the department to mark attendance for a member, checkmark All staff members in that location who are in the same department as the class box. • Best practice – Allow Front Desk only to mark attendance for a member. |
|
When is the Mark Attendance button available for Instructors? |
• Instructors/Front Desk can mark attendance for members. To decide how long before the start of class the Mark Attendance button will be available on the App, fill the time period in the Show attendance button text box. • NOTE: The Mark Attendance button is shown to the Instructor for 2 days after the class gets over in the Staff Calendar. In the Attendance reports the "Mark Attendance" button is shown to instructors even after 2 days • Best practice – 30 minutes |
|
Booking Cancellation Windows |
Clubs can decide to set 2 types of cancellation windows -
|
B. Instructor and Front Desk related Decisions
|
What? |
How? |
|
How to assign the Front Desk department to a staff member |
Web App: Manage> Staff Members • Select the staff member and on the Roles page and assign them: 1.The Front Desk department 2.The Coach or Manager role Best practice – Be careful who you give this role to as this person will have a lot of control over bookings, attendance and passwords. |
|
Who can mark attendance for a member |
Web App: Create > Company > Booking and Attendance • To allow Front Desk to mark attendance for a member, checkmark the All front desk staff at that location box. • To allow any instructor in the department to mark attendance for a member, checkmark the All staff members in that location who are in the same department as the class box. • Best practice – Allow Front Desk only to mark attendance for a member. |
|
When is the Mark Attendance button available for Instructors |
Web App: Create > Company > Instructor Substitution and Payroll • Class instructors can always mark attendance for members. To decide how long before the start of class the Mark Attendance button will be available on the App, fill the Show attendance button text box. • NOTE: The Mark Attendance button is shown to the Instructor for xx min after the class gets over. • Best practice – 30 minutes |
C. How a Front Desk Staff member can Manage Bookings and Mark Attendance for members?
|
What |
Details |
|
Manage booking for a member |
Mobile App > Club > Department> Calendar> Event • Event refers to a specific instance of a class on the calendar. • To manage booking for the event, touch the Manage Booking button. To add a member, touch the + Button on the bottom, search for the member and touch their name. • To cancel booking for a member, swipe left on the member name.
The same can done on the webapp by Clicking on Club > Department. Select the Calendar and click on Manage Booking for the specific event |
|
Mark attendance for a member |
Mobile App> Club> Department> Calendar> Event • To mark attendance for the event, touch the Manage Booking button. During the attendance window (set by director) touch the checkbox to the right of the member name. The same can done on the webapp by Clicking on Club > Department. Select the Calendar and click on Mark Attendance for the specific event |
|
Check booking for all calendar events |
Mobile App> Club> Department> Calendar> Event • To check bookings for all calendar events, touch the Club Booking button. This shows all members who have booked classes starting from the current time and showing all members who have booked for that specific day. • NOTE: This is useful for managing club access by members. |
D. How can Instructors Mark Attendance for Members?
|
What |
Details |
|
Mark attendance for a member |
Mobile App> Club> Department> Calendar> Event • Instructor along with optionally Front Desk and Member can mark attendance • The Mark Attendance button is shown xxx minutes (specified by the director) before the start of class till 30 minutes after class ends. The Attendance page has list of all members who have booked the class along with the waitlisted members. • To mark attendance, touch the checkbox after the member name. • Best Practice – Mark attendance for members who have booked the class yyy (specified by the director) minutes before class start. Best practice is 5 minutes. • Best Practice: After this if spots are available, instructor can allow members who are on the waitlist or queued outside to take the class. |
|
Web App: Manage> Reports> Attendance Reports • Instructor can also add headcount for their class anytime after the class is completed. Web App: Manage> Reports> Attendance Reports> Class Name • Instructor can use this section to - a. Mark Attendance for specific members. b. Add members after the fact. c. Mark an event as completed.
|
E. How can Members Book a Class, Waitlist themselves and Mark Attendance/Check-In for themselves?
|
What |
Details |
|
Booking a class |
Mobile App: Club > Department> Calendar>Event >Book a spot • The Book a Spot button will always be available to Members, but if a member attempts to book before the Booking window opens, they are asked to retry after the booking window is open. • Members who have booked the event can cancel their booking by touching the Cancel Booking button during the cancellation window which closes xxx (decided by the Director) before the start of class. • The booking confirmation is shown on the Barcode page on the App. • Members may optionally add the event to their phone calendar. • Once the cancellation window is closed, the Cancel Reservation button is replaced by the Mark Attendance button. NOTE: The Mark Attendance button is only shown if Marking attendance by members is allowed by the club. • Members who have not booked the class may do so until the event shows on the calendar until 30 min after the class ends. |
|
Marking attendance (if allowed) |
Mobile App: Club> Department> Calendar> Event > Attendance • To members who have booked the event the Mark Attendance button may be shown after the Cancellation window closes. • Members can mark attendance till xxx minutes before the start of the class. NOTE: The club can optionally allow the Mark Attendance button to be only shown to members who are in the club. |
|
Waitlist themself |
Members can waitlist themselves for a booking using the app by going to Mobile App > Club > Department > Calendar > Event with the "Full" badge > Waitlist me at *Waitlist Number* |
F. How can Members Book a Class, Cancel a Booking, and Waitlist themselves using the Web App?
- Clubs can allow their members to make reservations/bookings, cancel a booking, and waitlist themselves using the Web App.
- Clubs can implement this for their members by picking the calendar URL from the Web App for the department that you would like to allow their members to make bookings.
|
What |
Details |
|
How to provide the calendar/booking URL for members on your website |
Clubs can provide a URL for their members to make bookings on their website. You can go to Web App > Club > Relevant Department > Calendar tab > Copy the URL for this page > Provide it on your website. |
|
Members booking a class/Cancelling a booking/Waitlisting themselves |
Once a member clicks on this URL provided, they would be shown all the calendar events.
|
|
Early Cancellation Window |
Clubs can now allow their members to cancel their classes for a specific time period specified prior to the closing of the cancellation window. Clubs can change this setting in: Web App: Create > Company > Booking and Attendance Write the time period in the Early Cancellation window option |
|
Late Cancellation Window |
Clubs also provide a Late Cancellation window so that members can cancel their bookings up to a certain time before the start of a class. However, the club can decided whether to charge the member or not if they cancel during this window. In order to set that, go to: Web App: Create > Company > Booking and Attendance Write the time period in the Late Cancellation window option |
G. HOW TO USE RESOURCES?
"Resources" are the physical or virtual locations where classes will be conducted. In the case of a physical location, it could be a Studio/Court/Pool, etc, and in the case of a Virtual instance, your Resource is a Camera Resource. These Resources can include a Layout and the types of equipment that can be used in these physical locations. Resources are a very important construct in the Booking module as they help you customize the entire space where your classes will be conducted and how members or guests can take up spots in those locations.
Tasks that can be performed |
How to perform it |
Create and Delete a Resource |
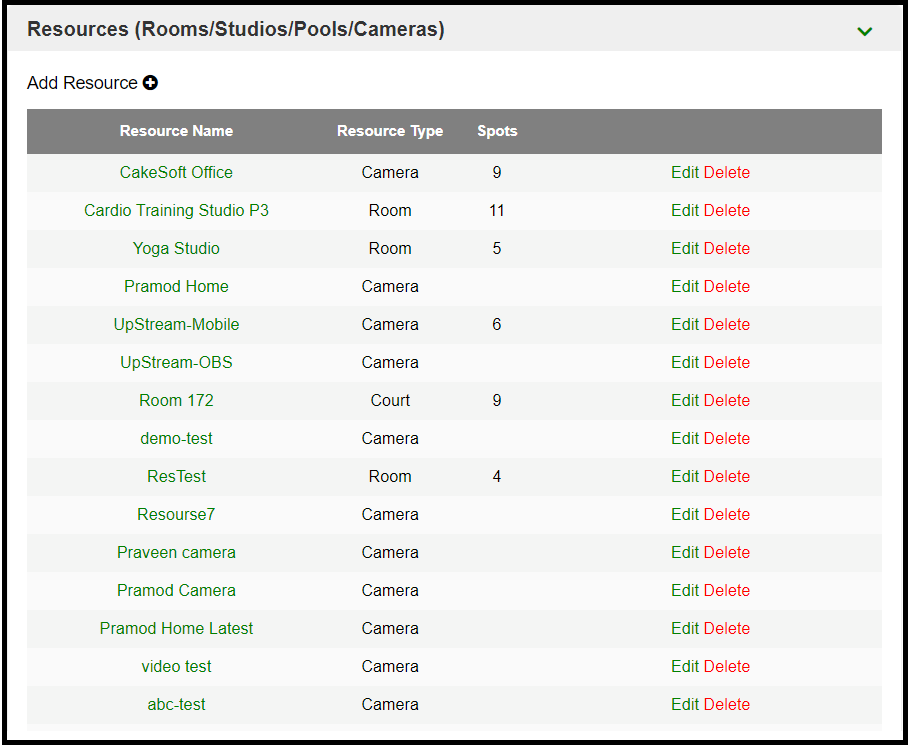
Resources with a custom layout can be created by going to: WebApp > Create > Clubs > Choose the Location of your Club from the Top Left corner of the WebApp > Resources > Click on the Add a Resource option (Refer screenshot G.1) On the Add a Resource option, you can enter details such as Resource name, Resource details, and if you do not want a Layout for your resource and want only spots to be booked by your members, then you can enter the details in the number of spots. If you would like to add a Layout, click on the Add Layout button and create a grid for bookings such as Spin room bookings, Swim Lane bookings, etc. Once a Resource is created, you can edit it or delete it by selecting the required Resource and clicking on Edit or Delete on its right. |
Edit a Resource |
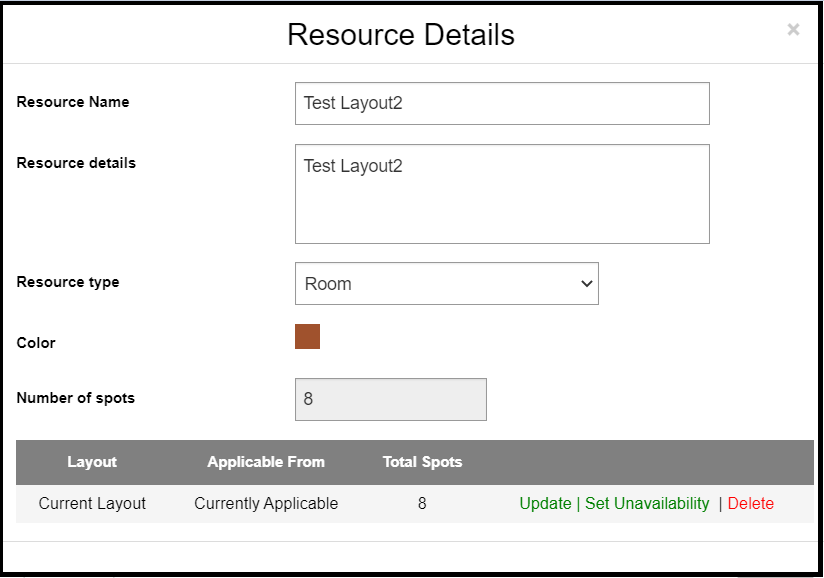
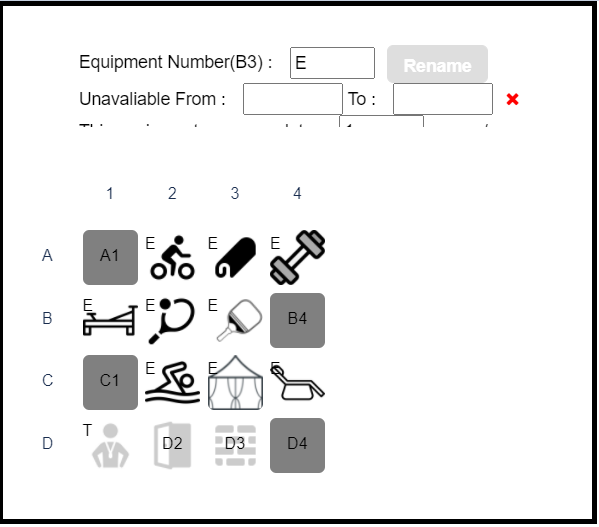
Once a Resource is created, you can perform tasks such as adding types of equipment to the layout; changing the number of spots bookable; setting unavailability for one or multiple spots on the Resource Layout, and selecting how many members can be booked in one spot. In order to do so, go to: WebApp > Create > Clubs > Choose the Location of your Club from the Top Left corner of the WebApp > Select the required Resource and click on it > Select the Update option (Refer screenshot G.2) Under the Update option, you can add types of equipment to the layout and set unavailability by choosing any tile on the layout entering details in the options that appear above the Layout diagram. You can also Delete any spot by choosing equipment or a spot in the layout and clicking the Delete option. |
Resource with multiple bookings |
Multiple members or their guests can book one spot or bookable equipment in a Resource. An example where this would be very useful is for a Tennis Court or in a Cabana setting. In order to do this, you first have to enable the option to accommodate more than one person in a spot in: Web App > Create > Classes > Select the Required class > Select the Booking Tab > Check the option 'Does the spot accommodate more than one person?' (Refer screenshot G.3)
Once done you can go to the Resources Section and edit which spot or bookable equipment can accommodate more than one person. In order to do so, go to: Web App > Create > Clubs > Choose the Location of your Club from the Top Left corner of the WebApp > Select the required Resource and click on it > Select the Update option > Select one or more bookable equipment from the Layout > Enter number of people to be accommodated in the option "This equipment accommodates"
|
SCREENSHOT G.1
SCREENSHOT G.2
SCREENSHOT G.3
H. HOW TO SHOW AVAILABLE SPOTS OR BOOKED SPOTS
When members book an event using the App, they can view information related to the event that they are booking on the App. One vital piece of information is regarding the available spots or booked spots for the Event. You can decide to show which information to show on the App, whether it is the Available Spots for the Event or the Booked spots. In order to do so you need to go to :
Create > Company > Booking and Attendance > Next to the On the Calendar Event Show option choose Available Spot or Booked Spot

H. Book Classes and Mark Attendance via Kiosk Pages
The Kiosk feature allows members to mark their own attendance or book classes via a tablet or shared device (such as an iPad) located within the club. This interface can also be used by instructors and front desk staff to manage members as they arrive.
This is particularly useful for managing check-ins in real-time as members arrive, allowing them to check themselves in or enabling staff to assist them quickly.
Note: Bookings made via the Kiosk are applicable to Free classes only.
Enabling and Accessing Kiosk Pages
To set up your Kiosk, navigate to Create > Company and select Kiosk Pages.
- Configure Departments: Use the checkboxes next to each department to enable Bookings, Marking Attendance, or both.

- You have 2 options to select from “All Departments Check-in” and Class Specific Kiosk Links:
- All Departments Check-In:
This option has 2 tabs and they both perform the following function:
- Mark Attendance: If the Class/Program is within the attendance window, users can search by Name, Barcode, or Email to mark attendance for themselves.
- Book a Class: Under the Book A Class tab, users can search for available Classes (within the booking window) and reserve a spot instantly.

- Class Specific Kiosk Links
- This option lets members check themselves into classes without needing to line up at the front desk. Clubs can now open a specific link on any computer, tablet, or iPad placed right outside a studio or workout room. Members can walk up, find their class, and mark themselves as present or book themselves into the Class (if the Booking and attendance policies permit)
- At the top of the screen, members will see the Class Name, Date, Time, and Room/Resource Name, alongside a live timer showing exactly how many minutes are left until the class starts.
- The screen will display a list of all members who pre-booked the class in large, easy-to-read text, along with their barcode number.

- Next to their name, there is a "Check In" button. When tapped, a friendly pop-up appears saying: "Check In successful! Have a great workout" (this disappears automatically after 3 seconds)
- Members can also click on the “Add yourself” button and add themselves in(Search via email, barcode or name). Members will see an option to “Book and Check-in” i.e., they will be booked into the class and will also be marked attended.