
A. Customizing the Mobile App Layout
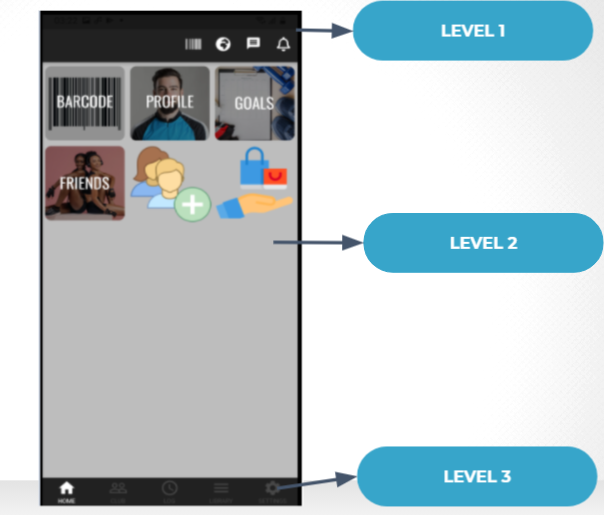
Did you realize your Mobile App is visually divided into 3 levels:
- Level 1 consists of the Barcode info, Notifications, Feeds, and so on.
- Level 2 is the main body of the App, which provides most of the info to the users.
- Level 3 consists of icons like Home, Club, Settings, Log and Library.
You can customize various aspects of all three Levels using the Web App to make your App visually and functionally appealing to your members. Please refer to the screenshot below to get some insight on the Levels of the Mobile App.
Customizing icons and banners on Levels 1, 2 and 3
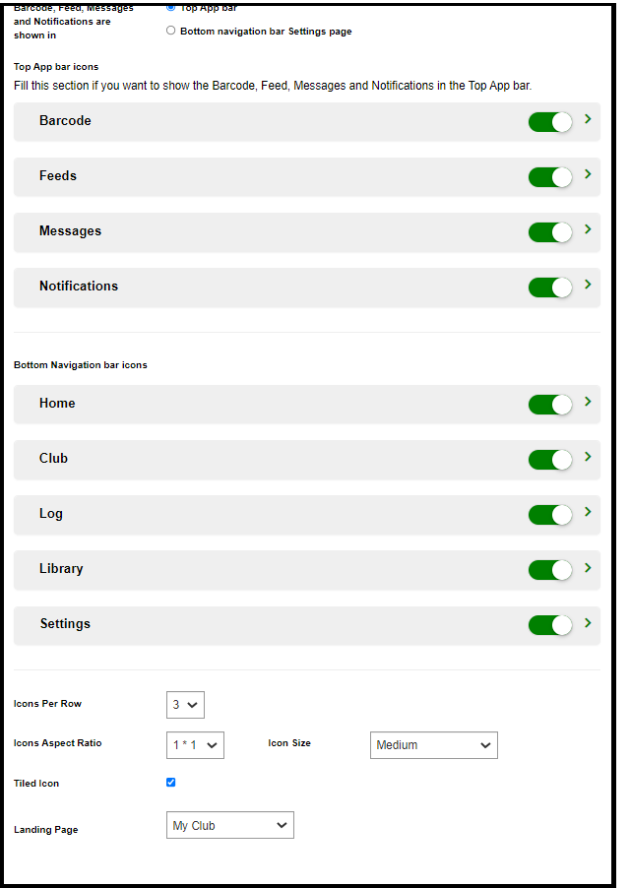
Levels 1 and 3 have icons that take you to a page in the App like the Home Page, Club page, Log page, or Settings Page, or provide information like Notifications, Feeds, Barcodes, and Messaging. By default, Level 1 and 3 icons are grouped and are named Top Bar icons and Bottom navigation bar icons.
You can perform several changes in the Web App to customize these interfaces (Refer to the screenshot below these bullet points):
- You can reorder the alignment of the icons in Level 1 or 3 by going into Web App > Create > Company > Mobile App Layout and reordering the icons labeled as Home, Log, Feeds, etc. You can reorder them by clicking them with the pointer and dragging them to a position as you see fit.
- You can change the icon picture and rename any of the icons in Level 1 and Level 3 according to your choice. To do so you must go to Web App > Create > Company > Mobile App Layout > Select the required icon and choose to rename the icon and upload a picture for the icon.
- You can change where the Barcode, Feed, Messages, and Notifications are shown, you can choose to place them on Level 1 or Level 3. Do note that if you show Barcodes, Feed, Notifications, and Messages on Level 3, then the Home, Club, Library, Log, and Settings will be shown on Level 1.
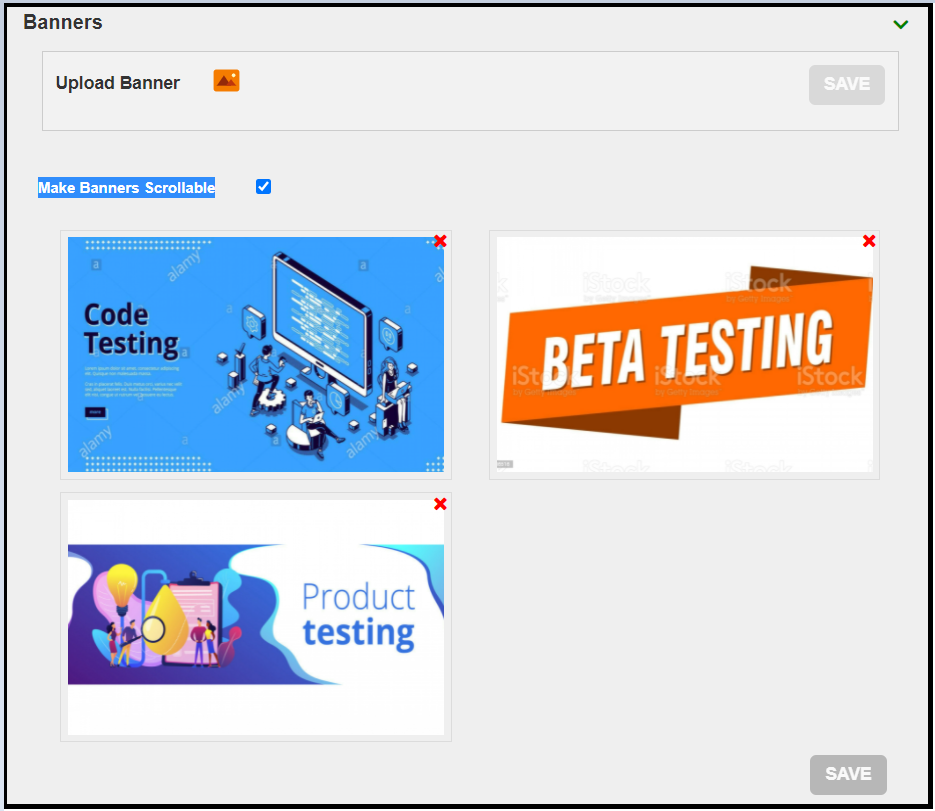
- You can add images on Level 2 of the Club page, highlighting your club and its activities. These images are called Banners, you can add one or more of those by going into
Banners and uploading the images there. You can make these images scrollable by members by checking the Make Banners Scrollable option. - You can change certain icon properties on Level 2 of the Mobile App.
You can change the icon size, number of icons in each row, whether the icon is tiled or not, Aspect Ratio, and the Landing page by going to Web App > Create > Company > Mobile App Layout and scrolling down to find the settings.
B. CUSTOMIZING THE LABELS OF ICONS
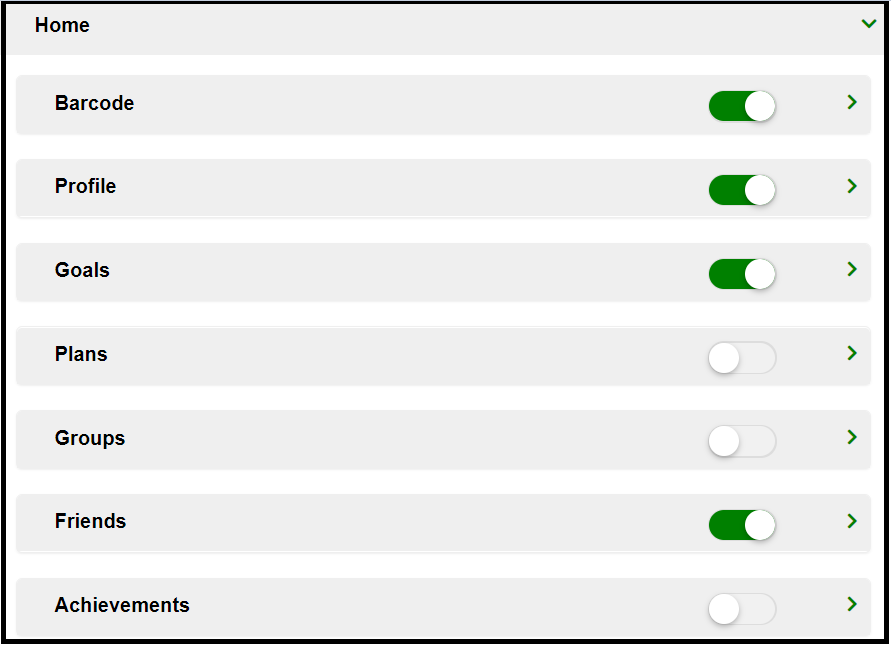
Every icon on every page, be it Home, Club, Log, etc., has icons and information. Every icon has a picture and name associated with it. We refer to these characteristics as Labels.
You can not only change Labels associated with the icon but the icons inside it too. For instance, the Home Page would have icons like Profile, Barcodes, Friends, etc and each of these icons would have information inside it. You have the power to change the Labels associated with every icon for every page on the App (Please refer to the Screenshots below).
To change the Labels and icons associated with the Home, Library, Log, and Settings page you need to go to Web App > Create > Company > All Icons and Select the page you want to make changes to.
You can make the following changes to icons inside Home, Log, Settings, and Library:
- You can decide to show or not show a particular icon by going to Web App > Create > Company > All Icons Select the page and turn on/off the sliders for the icons under it.
- You can change the icon picture and rename the icons for every page, to do so please go to Web App > Create > Company > All Icons Select the page and select the icon under the page you want to make changes to. You can choose an image file to be displayed as the icon picture and rename the icon to whatever you want.
The info above tells you to change the icons in the Home, Log, Library, and Settings page. The Club Page gives a lot of information to the members. All your Departments and their corresponding icons are shown on the Club page. Since there is a lot to customize on the Labels and icons under this page, we have a separate section for it. You can customize the various icons under the Club page by going to Web App > Create > Company > All Icons > Club and Selecting the Department you want to change. You can select the Department you want to change, rename it, and upload a picture which will be shown as the icon picture of the Department.
C. CUSTOMIZING DEPARTMENTS IN YOUR CLUB
The Club page consists of various Departments in your club, Calendar, and Virtual Departments. The Departments section in your Clubs is one of the key constructs of your Club. It has information about the classes, Trainers, Products, Services, Calendar, Hourly Deals, etc of any Department you choose to explore. You can customize many aspects of different Departments on the Club page. To customize any Department of your choice, you need to go -
Web App > Create > Clubs > Select the Location on the top left of Web App > Departments
Some of the tasks you can perform to make your Club page more appealing are listed below:
- You can choose to show any Department on your Club page. To do so, go to Web App > Create > Clubs > Select the Location on the top left of Web App > Departments > Select the required Department and use the slider to show or hide it.
- You can reorder the arrangement of the Department icons on the Club page of your Mobile App by dragging the Departments to a position of your choice.
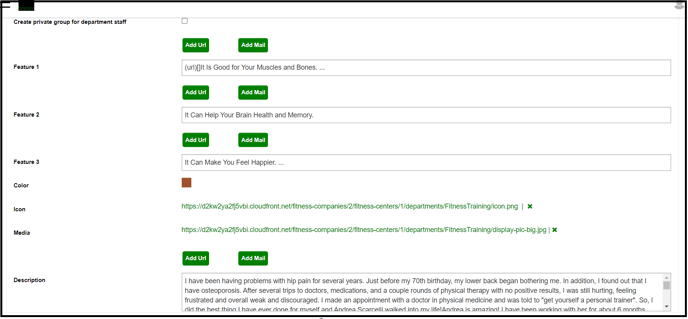
- You can add more information to a Department. This information will be visible to members once they open any Department icon on the Mobile App.
- Information such as different Features of the Department or the Services it provides, a brief description of the Department, the Director of the Department, Booking Helpline, Booking message and attach a media file. It is also possible to rename the Department and change the icon of the Department.
- To make the changes, you need to go to -
Web App > Create > Clubs > Select the Location on the top left of Web App > Departments > Select the required Department and click on it. You will be presented with the option to make changes (Refer to the screenshot below).
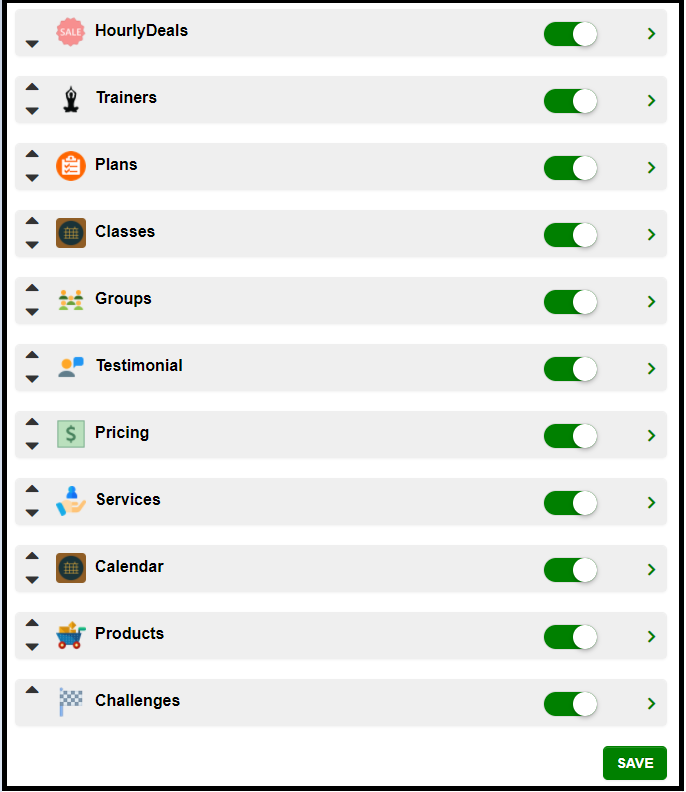
- As seen above, Departments contain a lot of things to deal with. Each Department has its own set of Trainers, Classes, Products, Services, and so on. Wouldn't it be awesome if you could tailor each of these to your convenience?
Well, guess what, you can do that!!. All the sections within any Department be it Classes, Products, Services, or Trainers can be customized. To do so go to the:
Web App > Create > Clubs > Select the Location on the top left of Web App > Departments > Select the required Department and click on it > Select from the list of sections under it.
- You can decide to show or not show any section in a Department by changing the slider to on/off.
- You can rename or change the icon of a section in a Department.
- You can reorder the arrangement of the Sections by clicking and dragging them across to a position of your choice
- You can also add a summary and a description which will appear on the section once the user tries to access the section using their mobile App.
- Clubs can also include a URL or a Hyperlink in the description.
Please Note: All the Departments and their sections are Location-specific, so make sure to select the Location from the top right and then make the changes.
To show any section under Departments you have to Showcase it first. To do that, go to
Web App > Manage > Showcase > Select the Department > Select the Section (Classes, Products, Trainers, etc) > Change the slider to on/off.
D. MAKING A DEPARTMENT VISIBLE ONLY TO STAFF MEMBERS
You can now decide to make departments visible only to Staff Members. This is useful when you and your Staff members want to test a department or any of its features before rolling it out for the members.
To make a department viewable only by the Staff members you need to:
- Go to Create > Club on the Web App
- Select the Department Information option
- Select the relevant department
- Check the option Show to Staff Members only
