
- Use e-mails, Push Notifications, and posts to market all of their services, products, classes and so much more.
- Target specific segments such as new members, members who have booked certain classes, members who are interested in certain activities and so much more.
- Communicate, connect and market to your members without any friction and in an automated manner.
Click to jump to a section
A. How to set up policies and identities for your Digital Marketing module?
D. How to use Targeting options to get to the right audience?
E. How to use Analytics for your Digital Marketing?
NOTE - To start using Member Marketing, you can contact - support@smarthealthclubs.com
A. How to set up policies and identities for your Marketing hub Module?
- To set up your identity and policies, you can navigate to Create > Company > Member Marketing.
- Here, you can make some key changes that will help build you begin your Digital Marketing using the SHC platform. They are -
- A coach can create a campaign - Enabling this allows your Personal Trainers and other service providers to run their own E-Mail campaigns allowing them to send e-mails to certain clients/sets of members. By default, this is only accessible by Managers.
- A coach can use campaigns created by directors - Enabling this allows your personal trainers/service providers to use a manager/directors campaign.
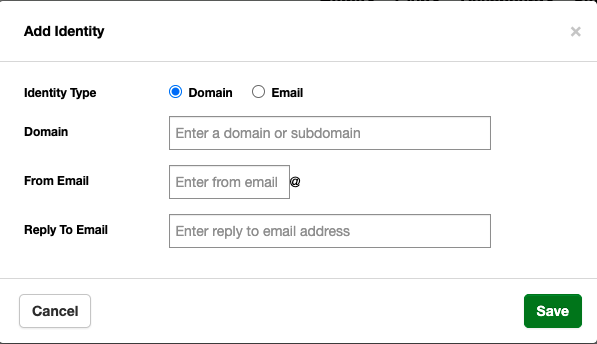
- Add Identity - This is an important part of the setup since the campaigns will predominantly be run through E-Mail. Here, when you click on "Add Identity", it allows you to add -
- A Domain - This setup is used to set up a specific domain/subdomain that your e-mails will be sent through. Here, you can also set a "From" and "Reply-To" E-Mail ID.
When you select the Domain option, you would also need to provide a domain name. It is best to get this information from your IT department.
After you have filled in the domain name, From, and Reply-To email addresses, click on Save.
You will then see ‘DNS Records’ with three CNAME records. Please take help from your IT department to put these CNAME records in your DNS server.
OR - An E-Mail - Here, you can simply decide on a "From" and "Reply-To" E-Mail ID and click on Save.
You will receive one email from Amazon to verify your email. Once you have verified your email, reload the Identity page or click on the refresh button to get the updated status.
- A Domain - This setup is used to set up a specific domain/subdomain that your e-mails will be sent through. Here, you can also set a "From" and "Reply-To" E-Mail ID.
NOTE - Verification may take up to 72 hours for domain verification.
NOTE - To set this up, you may need to contact your IT Department or Web Developer.
Screenshot A.1

Screenshot A.2
B. The Create > Campaign Page.
- Once the policies and identities are set under the Create > Company > Member Marketing page, you can get started with setting up various types of campaigns and E-Mail's that you would like to send to your members. This is done under the Create > Campaign page.
- This is the page that allows -
- You to see all of the campaigns that are currently being run, pause the campaigns, and restart them again.
- This is also the page where you can view and edit all of the templates that can be used when creating the E-Mails that you are going to send out.
- You can access templates by clicking on the "Templates" button.
Screenshot B.1

- On the Templates screen, you have the ability to access and edit multiple E-Mail templates.
- SHC provides you with a growing library of E-Mail templates under the "SHC Templates" section which you can edit and use or simply use the "Create Template" button to create a custom template of your own.
- When creating a template of your choice, you have multiple customizability options along with a great editing tool to help you design the best E-Mail you can.
Screenshot B.2

C. How to create a Campaign?
- A Campaign on the SHC Platform is an E-Mail or a set of e-mails that you can schedule for your members to receive based on certain targeting criteria. These e-mails can be set to go out to your members on scheduled days/timelines depending on how you set it up.
- Step 1 - Basic Information - Here, you can input the following:
- Department - Assign a specific department for your campaign.
- Campaign Name - You can use this field to set up a name for your campaign. This is for your reference and will not be shown to members.
- Description - This is where you can input information about the campaign and why it is being run.
- Category - You can also assign a category for this campaign. To create a new E-Mail campaign that you would like to run for your members, you can simply click on the Create > Campaigns > + Button. On the popup, you can set up -

- Step 2 - Compose message -
- Here, you will need to click on the + button to set up the messages that you would like to send to your members. Once you click the + button, you need to decide -
- Message Title - This is only visible to you.
- Subject line - This is the Subject Line of the E-Mail that will be sent to your members.
- Message Body - Clicking on "Edit" here will allow you to edit an E-mail from one of SHC's templates or you can create your own.
- After Days - Since you can create multiple e-mails in a campaign. This allows you to decide when this E-Mail should be sent. (Refer to Screenshot C.2)
- For every E-mail that you want to set up in a campaign, you can click the + button.
- For example - If you want to set up an e-mail campaign for your new members, you can decide that on Day 0 they receive E-Mail 1, and on day 3 they receive another E-Mail, and so on.
- Here, you will need to click on the + button to set up the messages that you would like to send to your members. Once you click the + button, you need to decide -

- Step 3 - Review
- In this section, you can review every part of the E-Mail campaign and also decide if you would like to send these e-mails right away or schedule them to start at a later date and click on "Save".
D. How to use Targeting options to get to the right audience?
- Once a campaign has been created and saved, you will be taken back to the Create > Campaigns page.
- On this page, you can decide whom you want to target for your campaign.
- You can click on the <Target Icon> to bring up the Targeting options page. (SS)

- On the Targeting Options page, you have the following options -
- "IN" and "NOT IN" - These two sections can be paired with -
- Default Groups - If "IN" and a specific group are selected together, only members IN that group will be notified. The same applies to NOT IN as well.
- Membership Tiers - You can select a specific membership tier that you would like to send these e-mails to.
- Public Groups - You can select a specific Public Group that you would like to send your e-mails to.
- Private Groups - You can select a specific Private Group that you would like to send your e-mails to.
- My Clients - This will be used by your Personal Trainers/Service providers if they would like to run campaigns for their clients.
- Joined - This option allows you to target members who have joined your club within a certain date range.
- Furthermore, you can filter your audience down to other specifics such as -
- Members who have booked a specific Class/Class category
- Members who have purchased a specific Service/Service category
- Members who have purchased a specific Fitness/Nutrition Plan
- Age/Gender
- Member Goals
- You can further also filter this campaign to not send E-Mails to specific members who have not checked in for a specific period of time.
- You can refer to the screenshot below to see how that looks.
- "IN" and "NOT IN" - These two sections can be paired with -

E. How to use analytics for your E-Mail Campaigns?
- After you have created a campaign, created E-mails, decided your target audience, and run your campaign, you can also view all analytics and track the success of your campaign.
- To do this, you can simply click on the Create > Campaigns > Analytics button for the campaign you want to view.

- On this page, you can view multiple analytics such as -
- Total emails sent
- Click-Through Rates
- Open Rates
- Bounce Rates
- Total Prospects
- New Prospects
