1.0 What are Feeds and Groups?
- Very similar to other social networks, SHC provides every App with the Feeds section where clubs are able to send out posts and notifications to various sets of members on the platform. These Feeds pages can have posts that consist of Text, Photos, and Videos.
- The posts on the Feeds page of the app can be posted by the following users -
- Members - Members have the option of putting out a post on the Feeds page limited to their friends. They can add friends on the app by going to the Home > Friends section of the app.
- Club Managers and Directors - Club Managers and Directors have the option of creating groups of members on the Web App and putting out posts to any of the groups created by them or one of the pre-created groups provided by SHC.
- Instructors - Instructors and Personal Trainers can have various interest-based groups that they can create in order to drive member engagement, such as a group for Pilates or a group for the Annual Marathon.
- All the posts on the feeds page can also be engaging to all of the members who receive it since all the posts can be liked and members can also comment on any of the posts.
2.0 How to setup Feeds and Groups on the Web App?
- To create a group on the Web App, a staff member can go to the Create > Groups section of the Web App. Here, SHC has already created 3 pre-populated groups for each location. They are -
- All Members Group - This group includes all of the members of the club and is automatically updated every time a new account is created for a member.
- All Staff Group - This Group includes all of the Staff members that are listed under the Manage > Staff section of the Web App. This group is updated automatically based on the staff members added.
- All Directors Group - This Group includes all of the Department Directors, Managers, and Admins of the club. This group is also updated automatically based on the roles assigned to the staff members.
- Once a user has clicked on the + button on the Create > Groups section of the Web App, they will be presented with a menu to set up the group (Screenshot 2.1). This has details such as Group Name, Type of Group (Public or Private), Relevant Department, Description, and Media. The two types of groups that can be created are -
-
Public - This is the type of group that can be created and left open to members for them to join. In this group, only the Group Leader is allowed to make posts while the members of the group are only allowed to Engage (Like and Comment) on the post that is put out by the Group Leader. For this group, staff can also enable "Auto Join" which allows member to automatically join a group without the need for approval by the Group Leader. Public groups can also be Showcased on the App using the Manage > Showcase section on the Web App.
-
Private - This type of group can be created by any staff member, but keep in mind that it works with "invite-only". You can create this group and it cannot be shown on the app as an "Open to Join" group since it is private. However, all members of a Private Group can make posts and engage with all posts as well.
-
- Once all of these details are filled in, the Members, Group Members and Group Leaders section on the bottom of the page can be used to add members/staff members to the group.
Note - When creating a group, by default, you will be the Group Leader and you do not need to add yourself to the group on the Web App.
Screenshot 2.1

3.0 How to access Feeds and Groups and make posts on the App
- Once the groups have been created on the Web App, the group leaders can go to the App and make posts to the created groups.
- Posts can also be put out by Managers to one of the Pre-Created Groups on the Web App.
- To access the feeds, a user can click on the "Globe Icon" on the top right hand corner of the Main screens of the app.
- To make a post, a user can click on the "Pen" icon on the Feeds page of the app.
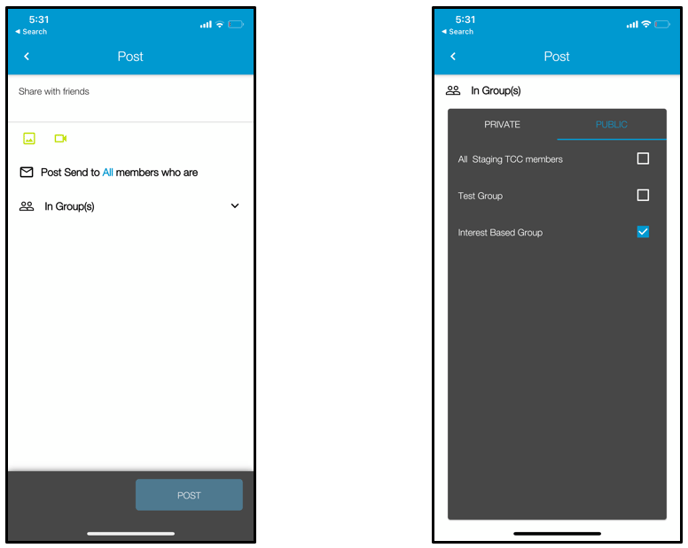
- On this page, by default, a member can make a post with Text, Photos/Videos to all of their friends. As staff members, there is an option to make a post in any of the created groups on the Web App. A member can populate the post with relevant information and click on the option that reads "Posts will be sent to all members who are in groups" and select the groups from the menu on the app. (Screenshot 3.1)
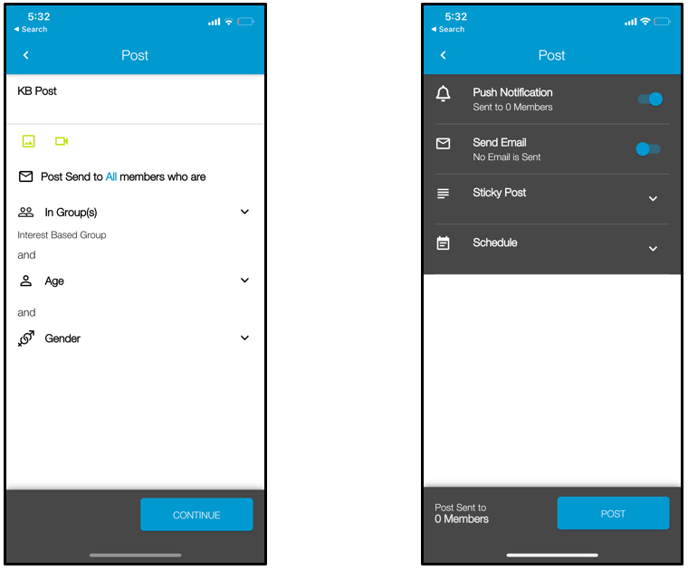
- Once the relevant groups have been selected (Screenshot 3.1), a member can further customize the post by Age and Gender. (Screenshot 3.2)
- After the information has been populated, click on the Continue button.
- In the next menu, the member has the option to enable the following options for a post - (Screenshot 3.2)
- Push Notification - This sends the post to all of the group members as a Push Notification. Use the toggle switch to turn this on.
- E-Mail - This sends the post to all of the group members as an E-Mail. Use the toggle switch to turn this on.
- Sticky Post - This means that the post can be set as a priority post on top of the Feeds page. If a post is set to be a sticky post, the post will remain on the top of the feeds page for a selected amount of time.
- Schedule - A post can be scheduled to go out at a certain time. On this section, a member can select a date and time to choose when the post should go out to all of the group members.
- Once these options are selected, the member can click on the "Post" button to send the post to all of the selected members.
Note - When sending a post, a member can select the Push Notification as well as E-Mail option to send the post as both.
Screenshot 3.1
Screenshot 3.2
4.0 How to add and engage with friends on the SHC Platform
-
As a member, on the SHC platform, you have the option of adding and engaging with all of the members who are a part of the club. This includes all of the Feeds functionality of putting out posts and engaging with them, adding friends, and sending personal messages to friends across the platform.
-
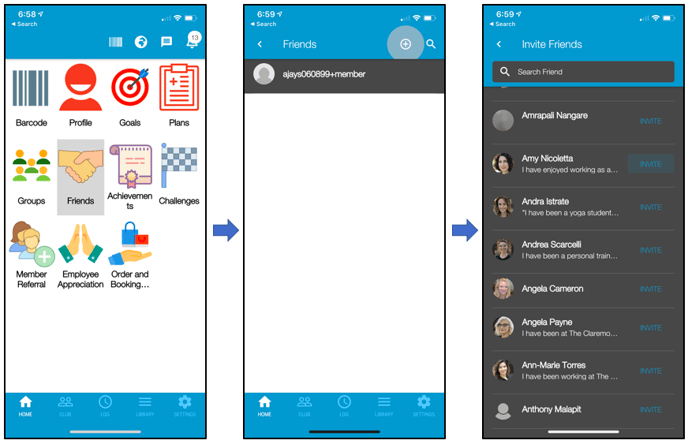
You can add a friend by going to the Home > Friends menu of the app and clicking on the "+" button on the top right-hand corner of the screen to add a friend. (Screenshot 4.1)
-
In the search box, you can look for a friend and click the "Invite" button to add a friend.
-
After this, your friends can accept your request and you can begin to create posts on the Feeds page that your members can engage with.
-
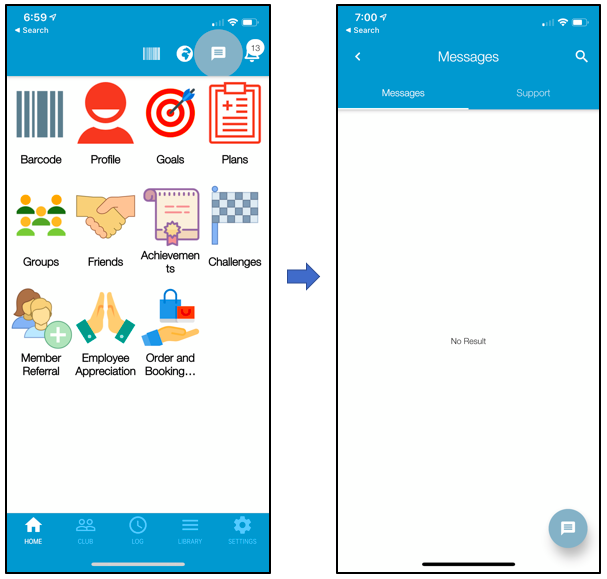
Apart from this, members can also message other members at the club using the messaging options available. This can be done by clicking on the "Messaging" button on the top right-hand corner of the screen. On this screen, a member can select from the list of users at the club and write them personal messages. (Screenshot 4.2)
Screenshot 4.1
Screenshot 4.2
4.0 How to make posts for Feeds and Groups on the Web App?
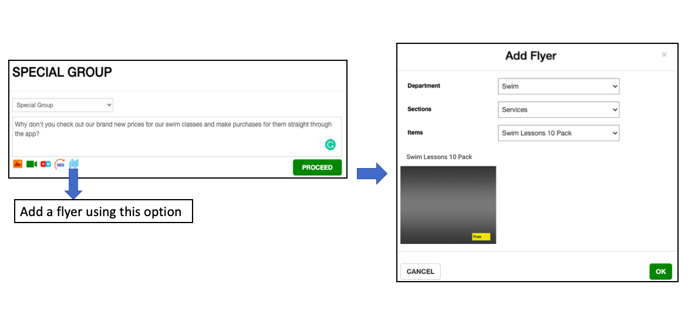
- The same functionality of creating a post and putting it on the Feeds page is also available on the Web App along with the ability to add a flyer:
- To make a post, you can go to Web App > Globe Icon on the top right-hand corner of the screen. Here you have the ability to:
- Write down the details of a post.
- Attach a Photo/Video to your post.
- Select a group you would like to make the post for.
- Add a Flyer - A Flyer allows clubs to make a post that can be linked to different parts of the App. When a post has been made with a Flyer, it allows members to click on a link that will take them to the section of the App selected by the person who has made the post.
Screenshot 4.1