1.0 How Do Members Experience this Feature?
2.0 How do you as the Club Manager set this up
2.1 Setting up the Trainer
2.2 Creating, Showcasing and Linking Services offered at the club
2.3 Enabling separate section for Private/Semi Private appointments in the app
2.4 Setting Up Booking Policies
2.5 How to Set Up Availability based calendars
2.6 How to set up calendar events for specific clients
2.7 How to set up event-based calendars
2.8 How to add Buffer time for Services
3.0 How can Instructors/Trainers/Tennis Pros work with Appointments and Availabilities on the Mobile App
4.0 How can Managers view all Services on the Mobile App?
1.0 How Do Members Experience This New Feature?
A member can easily Hire a Trainer, pick a service, pay for their sessions and make payments (using your billing company or Stripe) on the Mobile and Web App with 2-3 clicks. This can be done in 2 ways -
- By browsing through the list of trainers - A member can navigate over to the
- App > Club Page
- Department
- Pick a trainer of your choice
- Click "Hire Me"
- Pick one of the services offered by the trainer
- Book a slot on the trainer's calendar
- Pay for their session (Optional). (Screenshot 1.1)
Screenshot 1.1


2. By browsing through the list of services at the club - A member can navigate to the App > Club Page > Department > Pick a service of their choice > Click "Hire a trainer" > Pick one of the trainers that can provide the selected service > Book a slot on the trainer's calendar > Pay for their session (Optional). (Screenshot 1.2)
Screenshot 1.2


2.0 How do you as the Club Manager set this up?
2.1 Setting up the Trainer
Assigning the right Role for a Personal Trainer and Setting up their About Me page
There are 3 steps required when setting up a trainer profile (in most cases, this might already be setup for your trainers) -
-
- The first step to setting up the Hire a trainer module is to ensure that you have added a personal trainer's account. Then, they can set up an About Me page since this is the page a member would see when hiring a Trainer.
- Managers can go to the Manage > Staff Members section > Search for Personal Trainer > assign "Coach" Role for the appropriate department > Save to assign the appropriate role.
- Once done, personal trainers can log into their account and go to the Create > About Me page where they can set up the following member-facing information -
- A Detailed Bio.
- Add photos and videos about themselves.
- Add the hours that they are available.
- Add Testimonials
- Add Certifications and Training.
2.2 Creating, Showcasing, and Linking Services offered at the club
2.2.1 Creating a Service
-
- A service could be anything such as a Personal Training service, Swim Coaching Service, Massage Service, etc.
- In order to create Services that are offered at your club, you can go to the Create > Services page > + Button. Here, you can set up the following information about the service -
-
-
- Department of the service, Name of Service, and Duration of Service.
- Basic information such as a description, photos, videos, equipment required, benefits, and features.
- Use the "In-Person" tab if this is a service offered in-person to set up E-Commerce and Booking settings. This determines how your services can be booked and paid for by a member. You can use the Booking and Attendance and/or the E-Commerce article to learn more about this.
-
2.2.2 Showcasing and Linking the Service to the Trainer
-
- In order to -
- Showcase a service - You can go to Manage > Showcase > Department > Services > Use Toggle to showcase a service on the Platform. (Screenshot 2.1)
- Link the service to a trainer - You can go to Manage > Showcase > Department > Services > Click on "Trainers" > Checkmark the trainer that can offer the service. (Screenshot 2.2)
- In order to -
Screenshot 2.1

Screenshot 2.2

2.3 Enabling separate section for Private/Semi Private appointments in the app
You can now display different types of services in separate sections within the app. Below is a breakdown of each section:
- Services - Includes all services created within a department. This can include Private/Semi-Private appointments, Court/Equipment bookings, and Guest Passes.
- Regular Services - Displays only Private/Semi-Private appointments and Guest Passes.
- Court Bookings - Displays only court booking services.
- Equipment Bookings - Displays only equipment booking services.
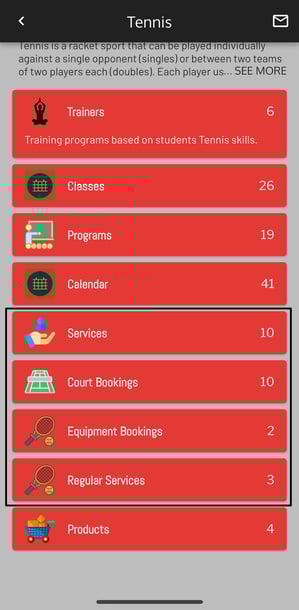
To enable these sections individually:
- Go to Create > Clubs page on the web app.
- Click on Department Information and expand your preferred department.
- Scroll down to access all different sections under the department
- Toggle the desired sections ON.
The system will then automatically organize the services into their respective sections in the app.

2.4 Setting Up Booking Policies
- Since Hiring a Trainer/Service will have bookings and members will be able to Book a trainer/service for a certain amount of time, it is important to set up how these bookings will function.
- In order to set up booking policies, you can go to Create > Company > Book a Service Provider Policies. Here, you can setup -
- Booking Closes - Setting up a time here will allow your Trainer to close the booking window for members. For example, if the time here is set to 12 hours, members will not be allowed to book services 12 hours before it starts.
- Close Cancellation window time - Setting up a time here will allow your Trainer to close the cancellation window for members. For example, if the time here is set to 30 minutes, members will not be allowed to cancel services 30 minutes before it starts.
- Show Attendance Button - Setting up a time here will allow your Trainer to mark attendance for members. For example, if the time here is set to 30 minutes, trainers will be able to mark attendance 30 minutes before the start of their service.
- Members can Mark Attendance Time - This will allow your members to mark their own attendance for any of the service slots that they have booked. You can specify when they are allowed to start marking attendance. For example, if the time here is set to 10 minutes, members will be allowed to check themselves into the service 10 minutes before the start of the service.
- Booking and Attendance are managed by - Here, you can allow your Front Desk and other staff members to mark attendance and manage bookings for any of the members who have made bookings.
- Member Booking Frequency - This option allows you to limit how many bookings a member can make in a single day. For example, if this option is set to 2 times in 1 day, a member will not be able to make more than 2 bookings in a single day.
- Reminder for all Booked members time - Setting up a time here will remind all members about their bookings a certain amount of time before the start of their service. For example, if set to 24 hours, members will be reminded 24 hours before the start of their booking.
- Late Cancellation Window - Setting up a time here will set a late cancellation window for your members who can later be charged an additional fee for canceling a booking. For example, if set to 12 hours, any member who cancels a booking less than 12 hours before their booking will be told that they are cancelling late and may be charged an additional fee.
- Front Desk can book outside of trainer availability - This option lets the front desk coach book an appointment with a trainer outside his specified availability on the app.
- Department Manager can book outside of trainer availability - This option lets the department managers or front desk managers book an appointment with a trainer outside his specified availability on the app.
2.5 How to Set Up Availability based calendars - Trainers/Directors
- On the SHC Platform, Calendar events can be set up based on availability. This can be done by directors and the trainers themselves.
- With this, you will be able to set up calendars based on the times that your trainers are available.
- This is a great tool that you can use allowing you to create multiple bookable services all at once. To set this up -
-
- First, follow the steps in part 2.2 of this article to create a service of your choice.
- Once done, you can use the Create > Calendar > Service Provider calendar section and click on the "Trainers" tab to set up trainer availability.
- On the popup, you can select a trainer/resource, date, and time of availability along with the recurrence rules.'
- As an example, if you offer a 30 minute and a 60 minute PT service and you set up your availability between 12 PM and 4 PM, the software will automatically create 8 events of 30 minutes and 4 events of 60 minutes.

2.6 How to set up calendar events for specific clients - Trainers/Directors
-
Calendar events can be created on the WebApp for specific clients that a trainer may be training. This can be set up by both directors and the trainer as well.
- With this feature, trainers can create events for specific clients, track appointments and give members the ability to view their training appointments as well.
- This will only be available on the SHC Availability based calendars.
- To do this, you can -
-
- Navigate to the Create > Calendar page.
- Here, you can select the "Add Event" button.
- On the pop-up, you can select the Service, Date, Time, Resource and Input the client name and click on the "Save" button

- Once done, trainers can track all of their service appointments on the Web App > Create > Dashboard > Service Calendar section of the Web App.
- In addition, trainers can also use the Mobile App > Dashboard > Calendar section to view all service appointments.
- The trainers would also get Push Notification reminders before any appointments that they have.

2.7 How to Set Up Event Based Calendars
Since members can make a booking for a specific trainer, special calendars need to be set up for each trainer. Calendars can be created for any department using the Hire a Trainer/Service provider functionality. You can choose one of two options to set up calendars:
Option 1: Calendars from their Billing Company - With this method, the SHC Platform will be able to read the calendars of any personal trainers that are set up on the clubs' Billing Company and make them available on the SHC Mobile and Web App.
Apart from setting up the trainers' calendars on the Billing Company, there are a few other steps you need to take:
-
- Connect the trainer profile on SHC to the one in your Billing Company: You can do this by going to Manage > Trainers and Instructors > Select Department > Select Trainer and use the "Related Trainer Name" option to connect the SHC profile of a trainer to their Billing Company Profile. This will allow SHC to read the Trainers calendar.
- Connect the Service created on SHC to the one in your Billing Company: Once done, you can go to the Create > Services > In-Person Tab > E-Commerce > Related Service Name. This will allow SHC to connect to the service set up on the Billing Company.
Note -
For Option 1, clubs would need to contact SHC to connect their departments with the Billing Company calendars.
For Option 2, clubs would need to contact SHC to create calendars for all personal trainers.
Screenshot 2.3

Screenshot 2.4

2.8 How to set up Buffer time for Services.
- Buffer time/Equipment preparation is a particularly useful feature for Massage Rooms or a similar setup. The Buffer time allots a specific amount of time after the completion of a service and during this time bookings cannot be made.
- This is particularly useful in a situation where a Massage room has to be set up after the completion of a massage service so that the Massage room can accommodate the next client.
- You can set the time period you want to be the Buffer time for different departments by doing the following:
- Open the Web App
- Click on Create > Company
- Select the Book A Service Provider Policies
- Set the time period next to the Equipment Preparation time option.

On the Availability calendar, the buffer time will be automatically added post every booked appointment, it will be shown as an orange block.

3.0 How can Instructors/Trainers/Tennis Pros work with Appointments and Availabilities on the Mobile App
Instructors, Trainers, and Tennis Pros can now set up their availabilities, and schedule/cancel/reschedule their appointments with Clients using the Mobile App via the Staff Calendar option. This calendar is found in the Dashboard section of the App. Using this option Staff members can also Charge the members while booking the appointment.
3.1 How can Instructors/Trainers/Tennis Pros set up their Availabilities on the App
Instructors/Trainers/Tennis Pros can set up their Availabilities using the Mobile App by clicking the Calendar option on the Dashboard page. This feature is very similar to how you setup and edit Availabilities on the Web App. The availabilities will appear as vertical lines. Clicking on those availabilities will allow the Instructors to edit those Availabilities too
To set up/edit an Availability via the App you need to:
- Click on the Dashboard page on the Mobile App and select the Calendar option
- Click on the + icon at the bottom right of the screen and select Add availability (Screenshot 3.1)
- The vertical columns show the availabilities on different days, clicking on them will let you edit the Availabilities. (Screenshot 3.2)
Screenshot 3.1

Screenshot 3.2

3.2 How can Instructors/Trainers/Tennis Pros set up appointments and charge members via the Mobile App
Instructors/Trainers/Tennis Pros can set up Client Bookings/Appointments using the Mobile App by clicking the Calendar option on the Dashboard page. This feature is very similar to how you set up Appointments on the Web App. Upon entering details to set up the Appointment and clicking on save, the Instructors can also charge the clients for the service. They can either Charge on the billing company, Send a payment link, or Give a free session. This too works exactly similar to the Web App.
To set up an Appointment and charge the member via the App:
- Click on the Dashboard Page and select the Calendar option
- Click on the + icon on the bottom right and select Add Event
- Enter the details under Add event such as Service name, Client Name, Date, Time, and so on.
- Upon Clicking Save, if the service is a paid service you will also have the option to charge the Client. (Screenshot 3.3)
- If the instructor wants to edit (Reschedule or Cancel) the Appointment then they can select the particular date from the App, click on the Appointment, and click on the pencil icon on the top right to edit it. (Screenshot 3.4, I have used Armaan Shred as an example for the Appointment)
Screenshot 3.3

Screenshot 3.4

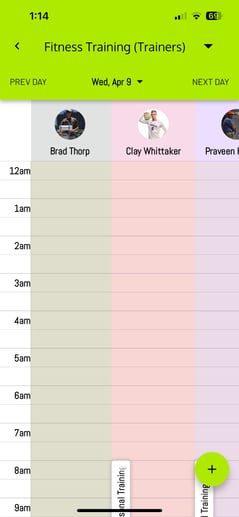
4.0 How can Managers view all services on the Mobile App?
- Managers can get a comprehensive view of all private appointments of all the trainers through the Staff Calendar on the Mobile App. Follow the steps below to access it:
- Open the Mobile App and navigate to Dashboard > Staff Calendar.
- Note: The location of the Staff Calendar may vary depending on how your app is customized.
- Once you're in the Staff Calendar, tap the dropdown at the top of the screen and select Personal Training (Trainers). Please note that the department name may vary across different clubs.
- You will now see all trainers’ bookings consolidated in a single calendar view.